Launching Your Refer-a-Friend Program with Partnero: A Step-by-Step Guide
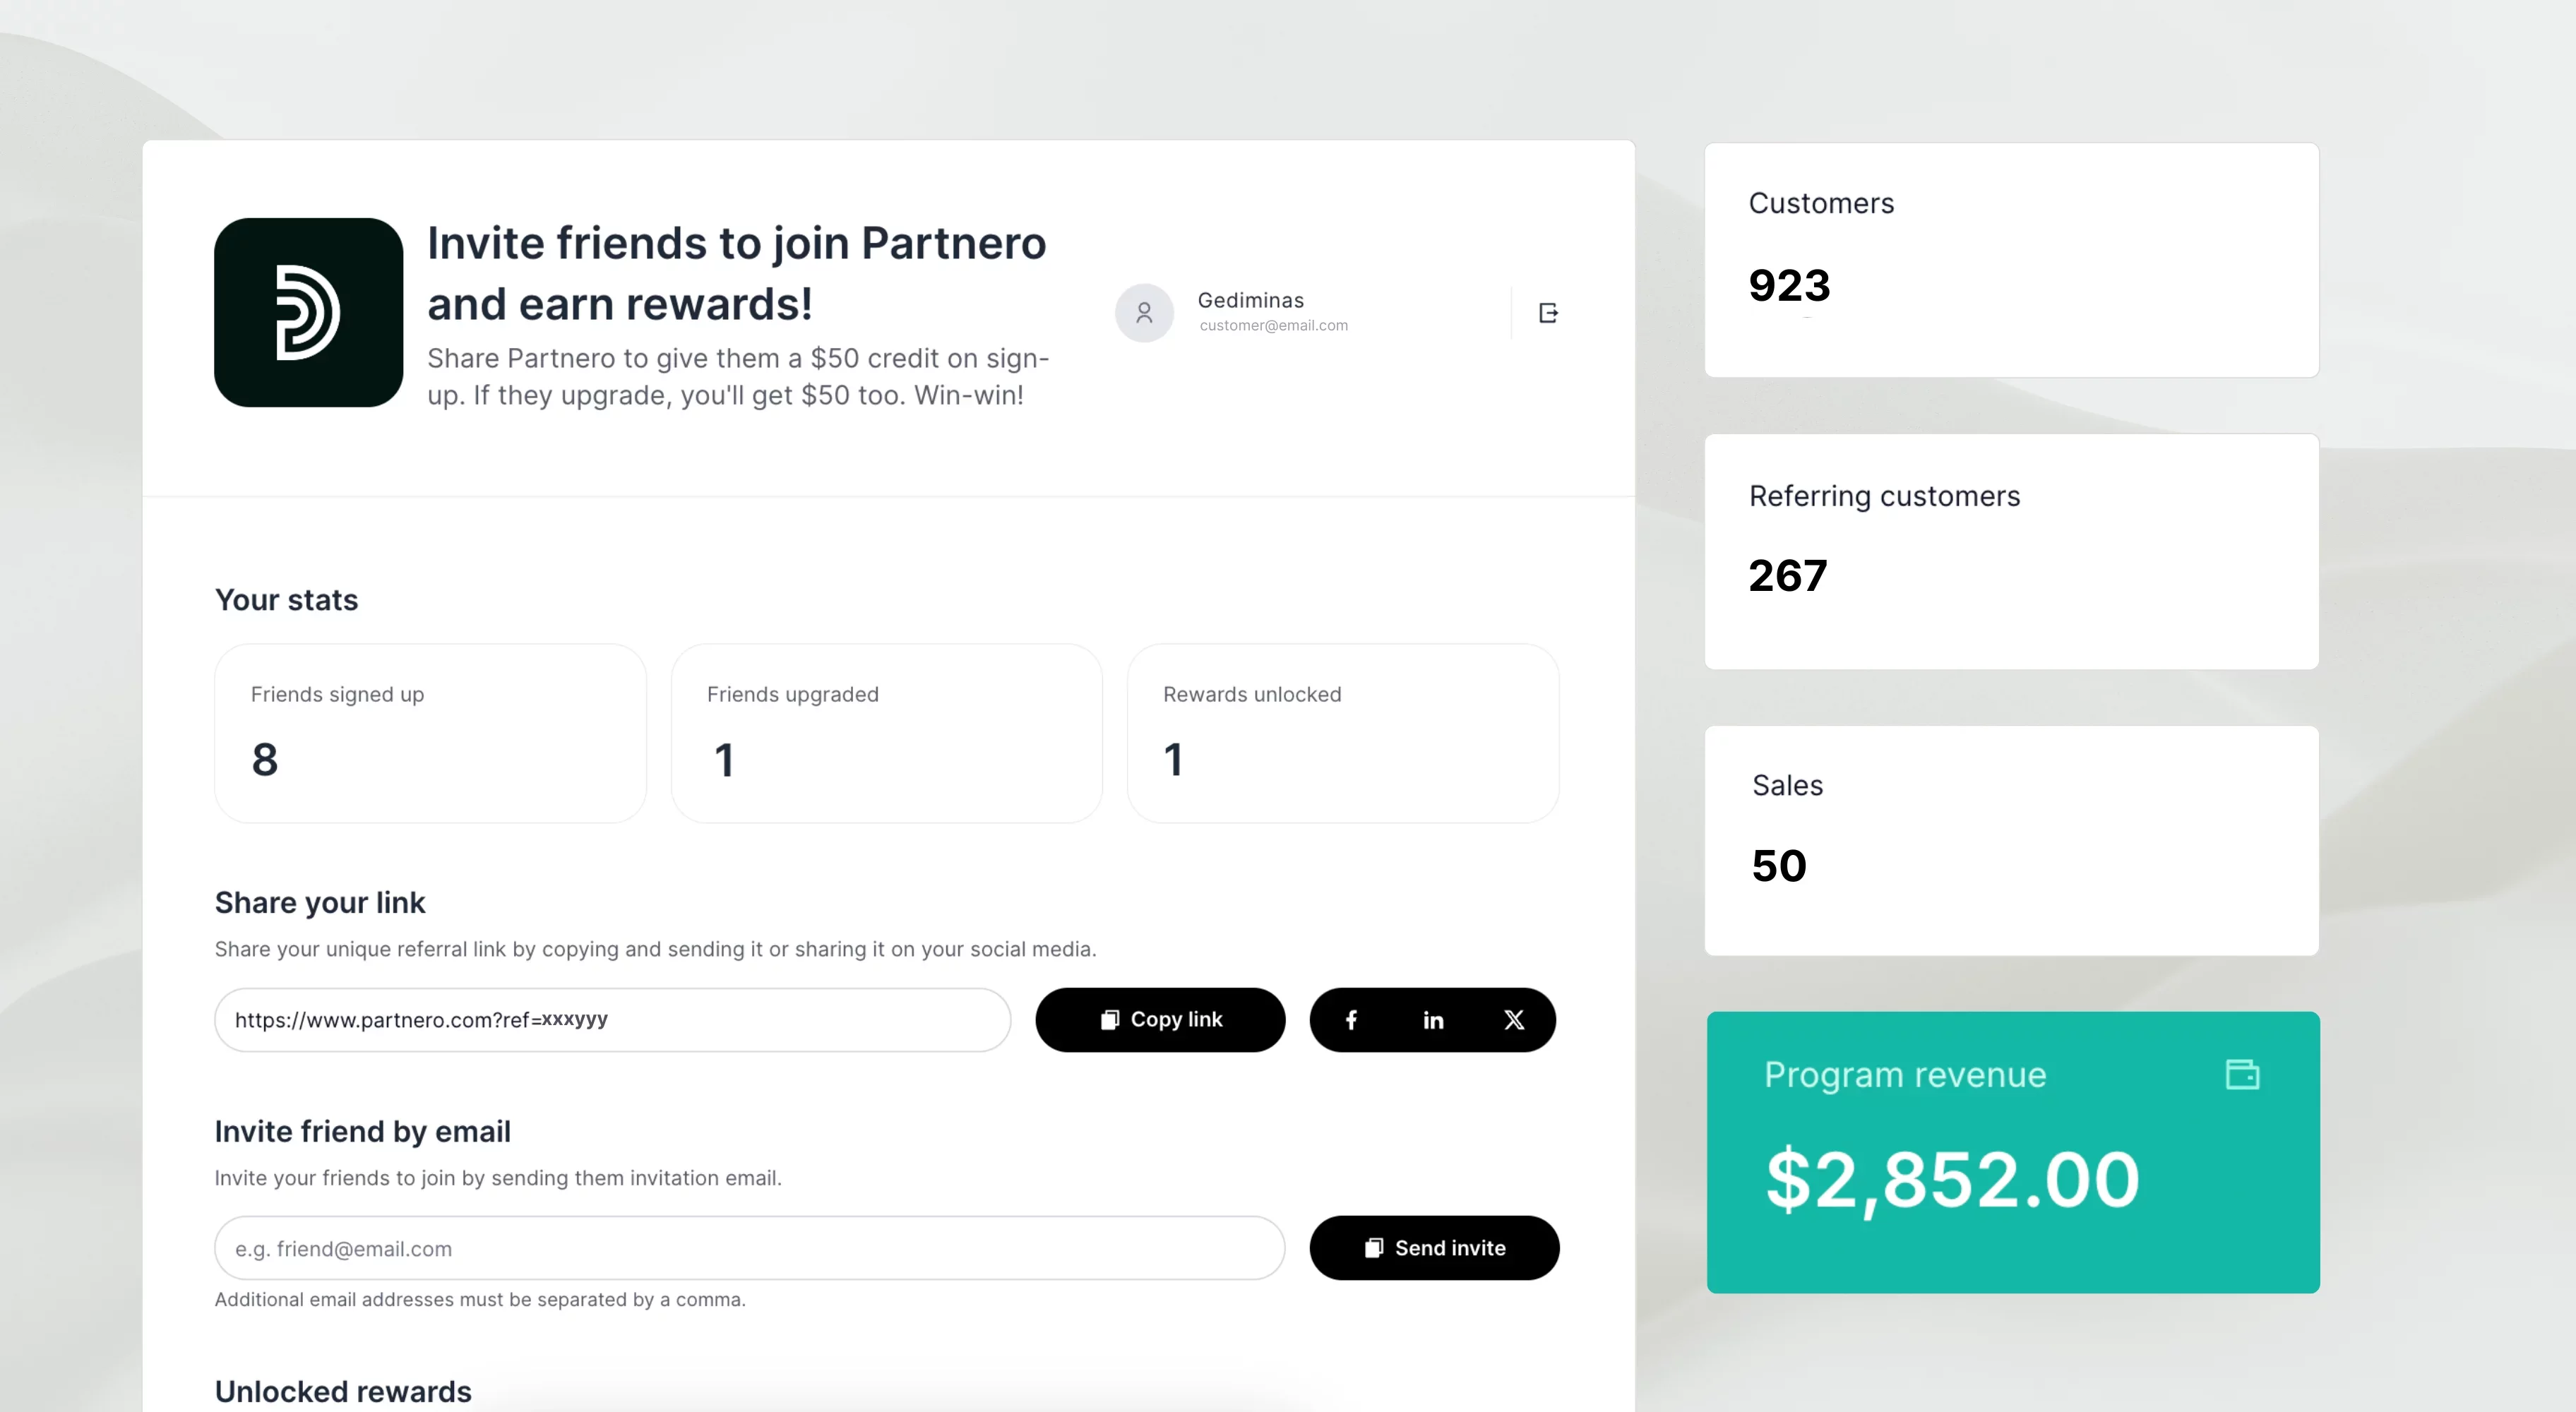
A Refer-a-Friend program can be a powerful way to drive business growth, encouraging existing customers to promote your application to their network. By incentivizing your existing customers to promote your application within their networks, you can tap into the power of personal recommendations and trust. There’s nothing like word-of-mouth.
Partnero simplifies the process of setting up and managing Refer-a-Friend programs so you can focus on what matters most - growing your business.
In this comprehensive guide, we'll walk you through creating and integrating a Refer-a-Friend program on Partnero. Our step-by-step approach will ensure you can seamlessly incorporate this powerful marketing tool into your application.
By following this guide, you'll be able to:
Establish a referral program that motivates your current customers to introduce friends to your product or service
Set up a reward system for successful referrals
Integrate the program smoothly with your existing platform
Whether you're new to referral marketing or looking to optimize your current strategy, this guide will provide you with the knowledge and tools to leverage the potential of customer advocacy.
Let's dive in and transform your satisfied customers into your most effective marketers!
Set a goal and structure
Like any partner program, it’s important to set a goal and contemplate the structure of your refer-a-friend program. For example, your goal and structure could look like this:
Goal - To increase your customer list through your Refer-a-Friend program.
Structure - Offer a 20% discount code for the referring and referred customers.
Configuring your Refer-a-Friend program
Here is how a Refer-a-Friend program works using Partnero:
A customer signs up for an account on your application and is given a unique referral code.
The customer shares this referral code with their friends, family, or network via a referral link.
When a friend signs up for an account on your application using the referral link, they are considered a referred customer.
Partnero tracks the referral and attributes the signup to the referring customer.
In this example, we will offer unique discounts (promotion codes) as rewards for the program participants.
First, you’ll need your Partnero account. If you don’t have one, sign up!
Create a Refer-a-Friend program
1. Setting up the program
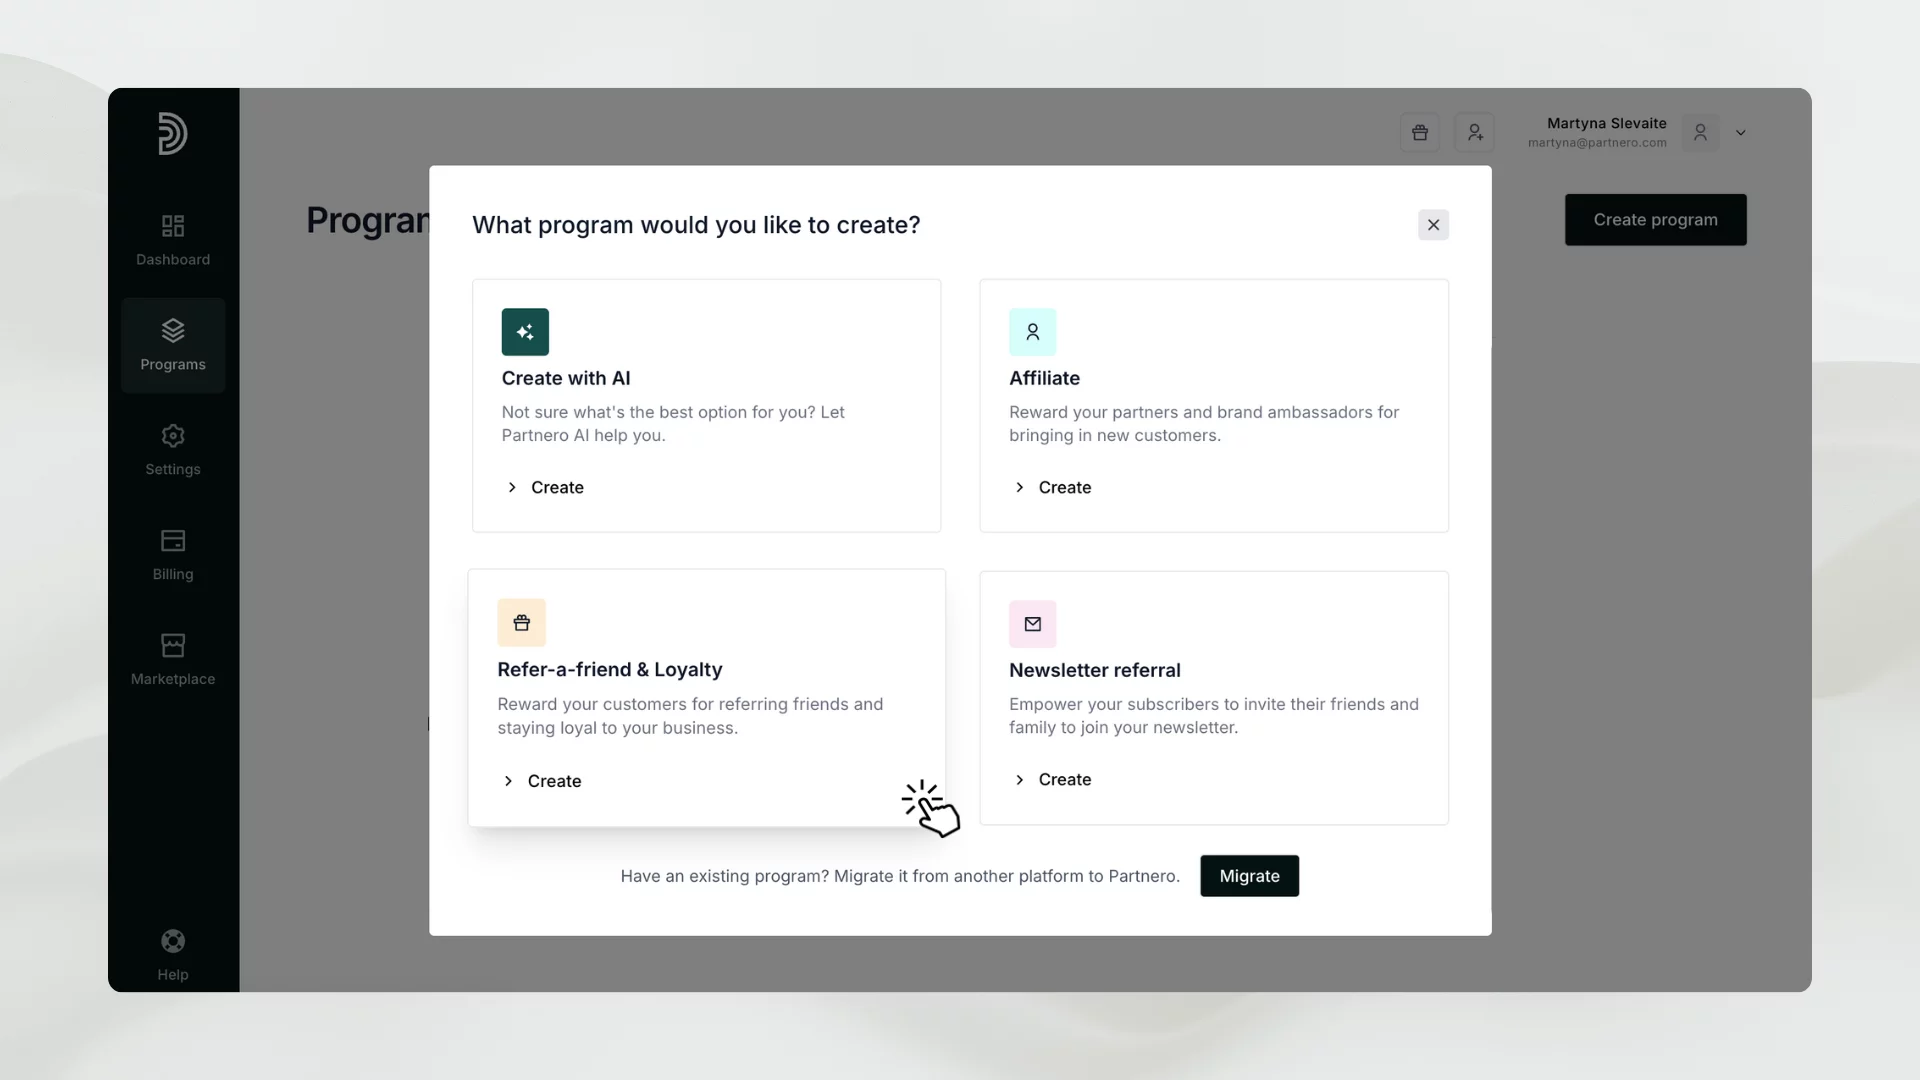
Log in to Partnero and go to Programs → Create a program → Refer-a-Friend program.
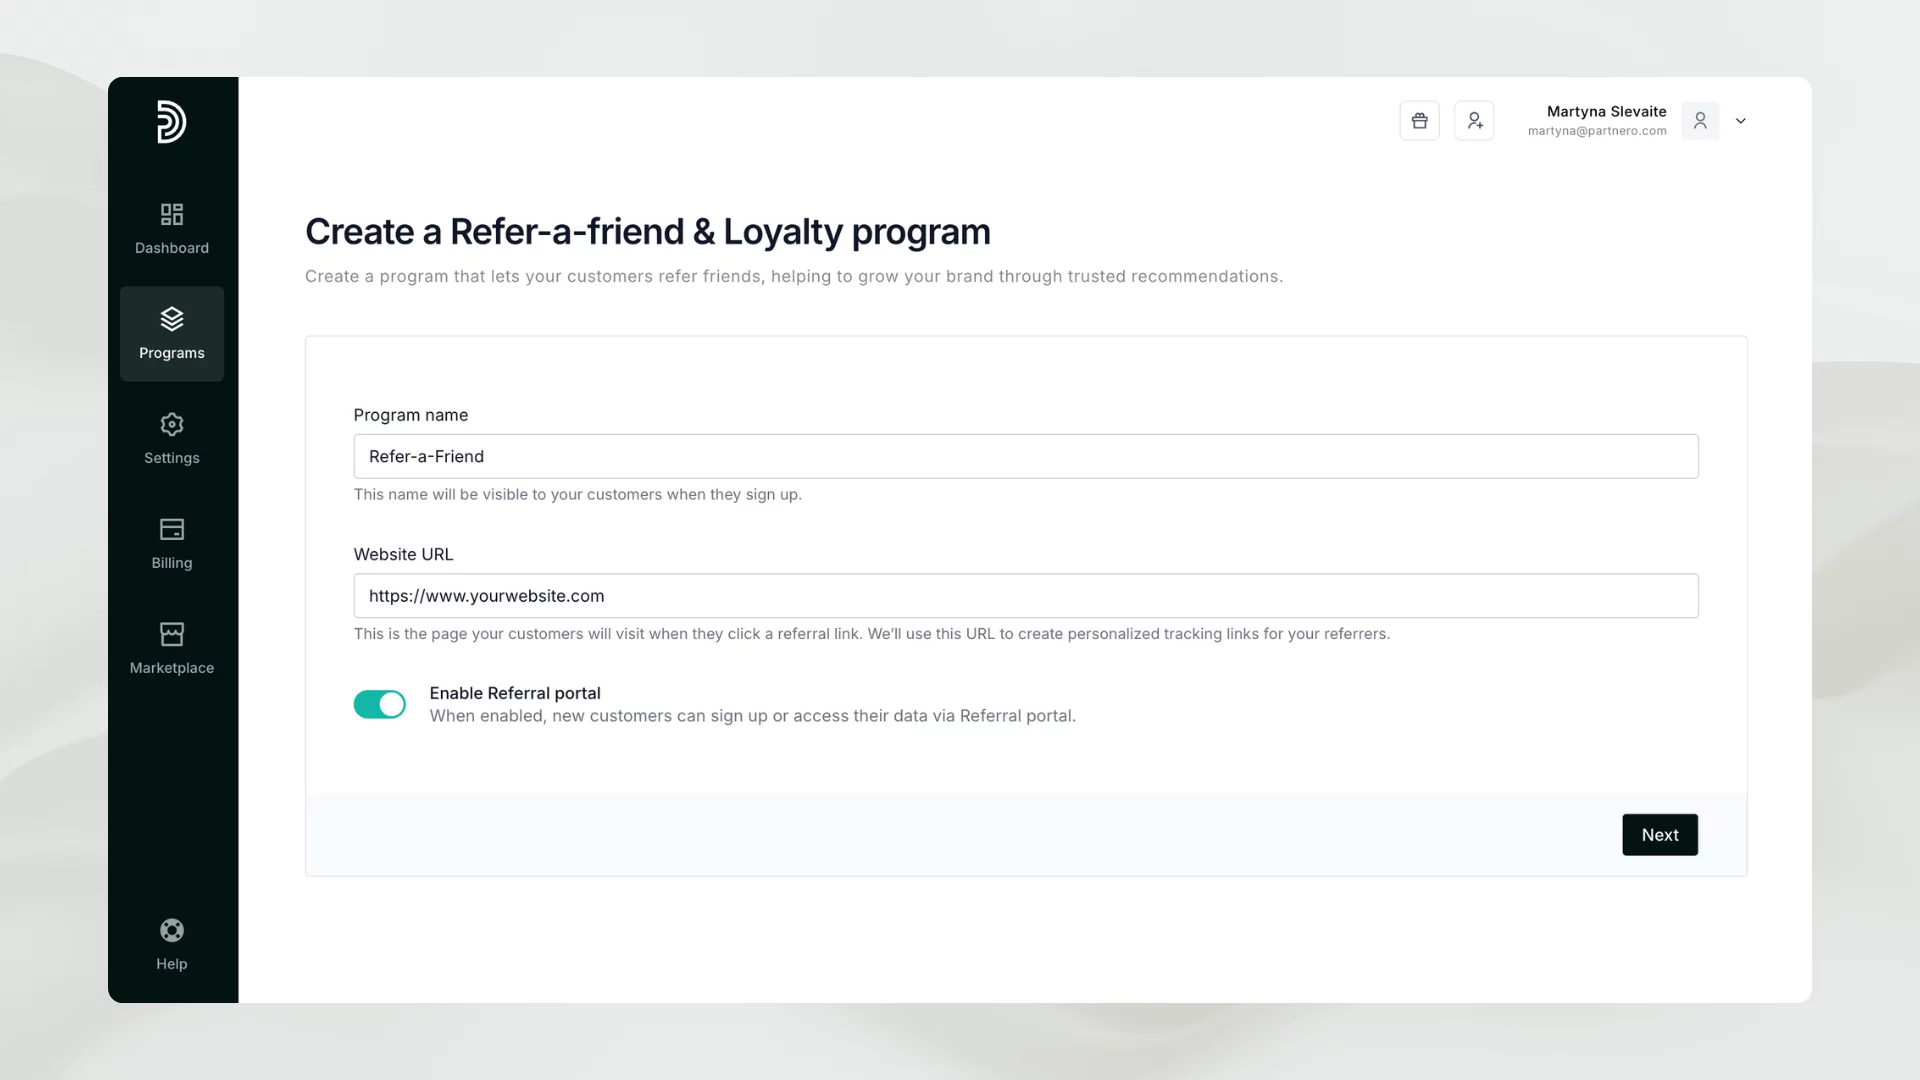
Name your program and enter your website URL: referred visitors will land on this URL.
Your program is now set up. Let’s import and customize!
→ Alternative: Create a program using AI
2. Importing customers
Partnero’s Refer-a-Friend program can work with your existing client base.
Let’s say you already have a customer base. The easiest way to add them to Partnero is to import them manually from a CSV file. Just go to Customers and select Import.
CSV file can contain these columns:
Email address: email address of the customer;
Name: name of the customer;
Last name (optional): last name of the customer;
Customer ID (optional): unique key of the customer, which can be their email address;
Customer key/token (optional): public customer identifier, which will be used to generate a unique referral link;
Joining date (optional): the date when the customer joined;
Referrer ID (optional): unique ID of the referring customer, used to associate the customer with their referrer (if applicable);
Referrer key/token (optional): unique key of the referring customer (or referral link token), used to associate the customer with their referrer (if applicable);
Referrer email (optional): email address of the referring customer, used to associate the customer with their referrer (if applicable);
We recommend using the email address and name as the customer ID or customer key. You have the option to assign two key customer identifiers for each customer:
Customer ID: This can be the customer's email address or a unique identifier from your platform.
Customer Key: This is used to generate personalized referral links. If you prefer more customized links, you can set this manually. Otherwise, it will be automatically generated.
These identifiers help track referrals accurately and create more personalized customer experiences in the referral program.
CSV example here.
You can upload a list of customers without any referred customers. If a list of referred customers is needed, it must include an additional column.
CSV example here.
You'll be able to match the file data with the corresponding fields:
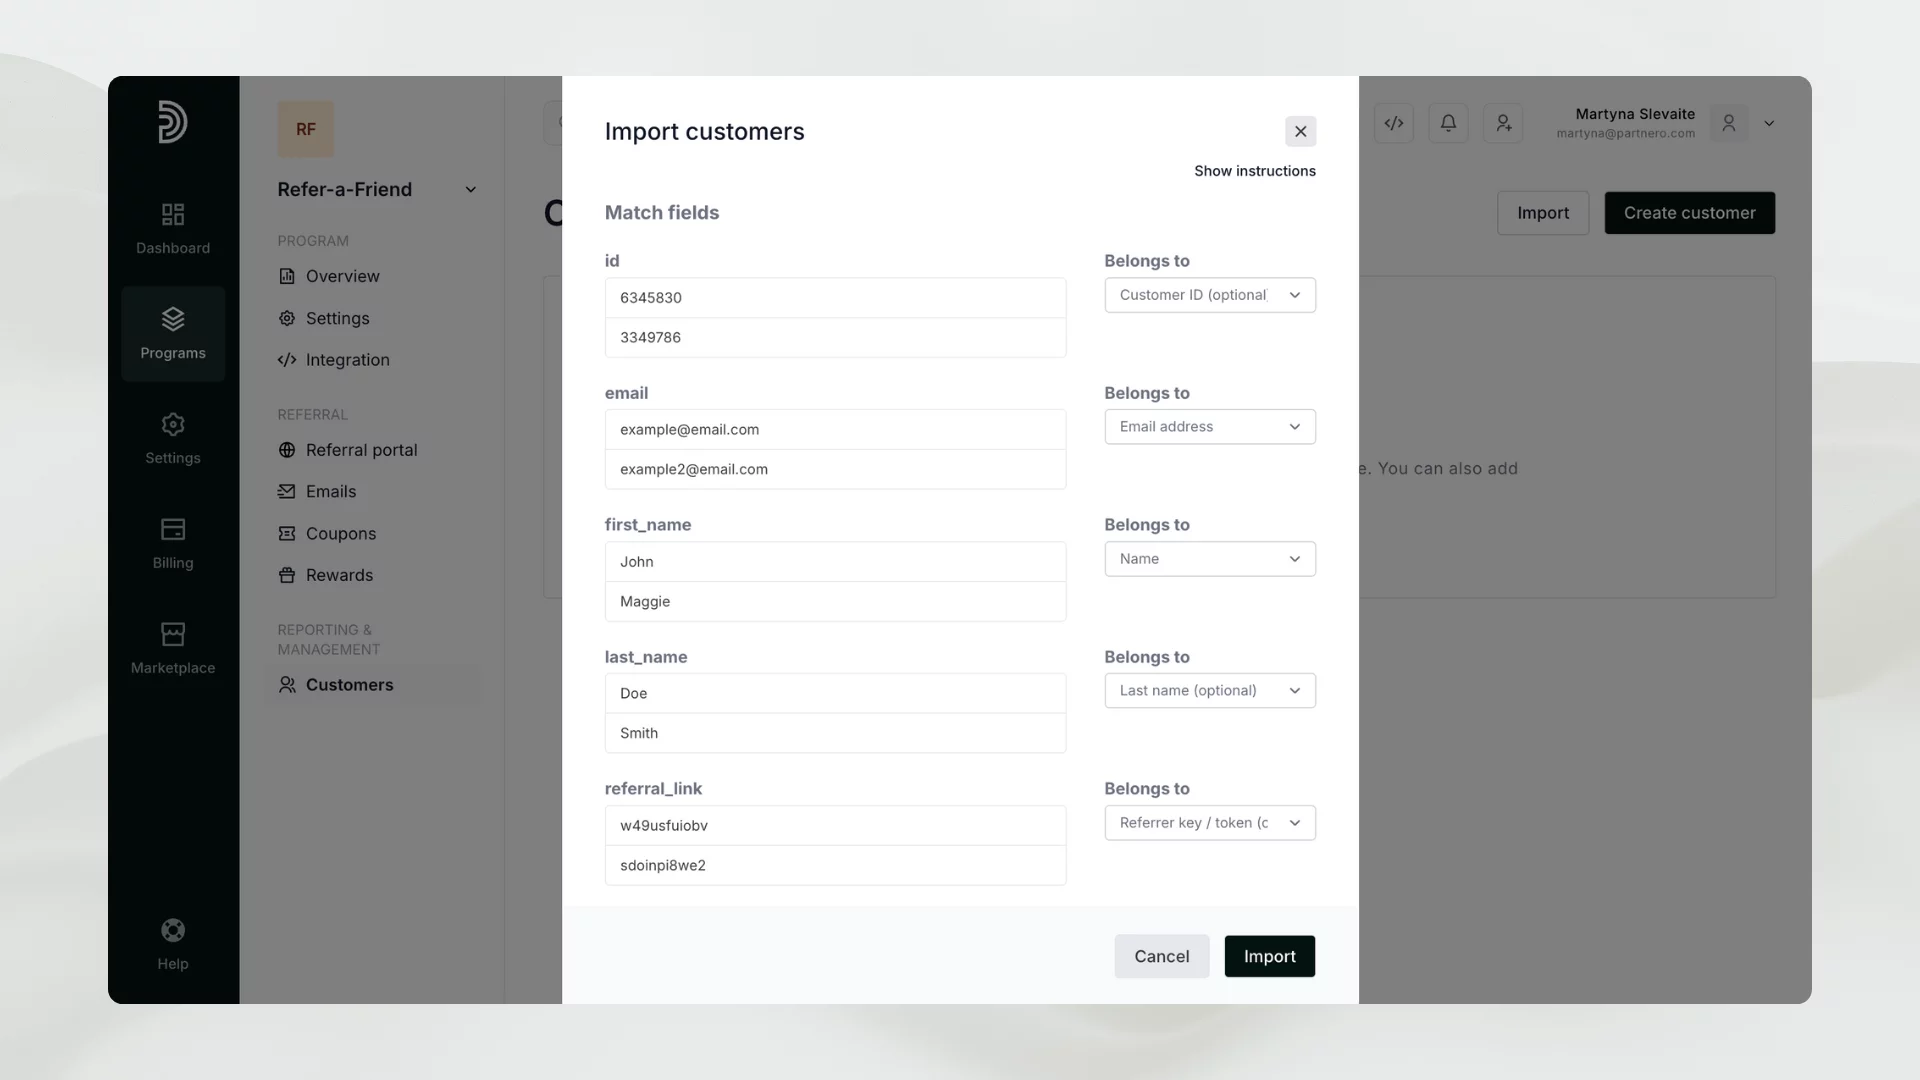
Once the customer list is uploaded, Partnero will generate a unique referral link for each customer that they can share with friends and family.
3. Referral portal
The next important step is to make your referral program visible and accessible to your customers. To accomplish this efficiently, we recommend enabling the referral portal.
This user-friendly interface will allow your customers to easily view their unique referral links and access other essential features of your referral program.
To enable the referral portal, go to Program → Settings and toggle the setting on.
Once the referral portal is enabled, a new Referral portal menu option will appear on the program’s sidebar.
You can then go to the Referral portal section and adjust content, appearance, access, and other settings. Here’s an in-depth overview.
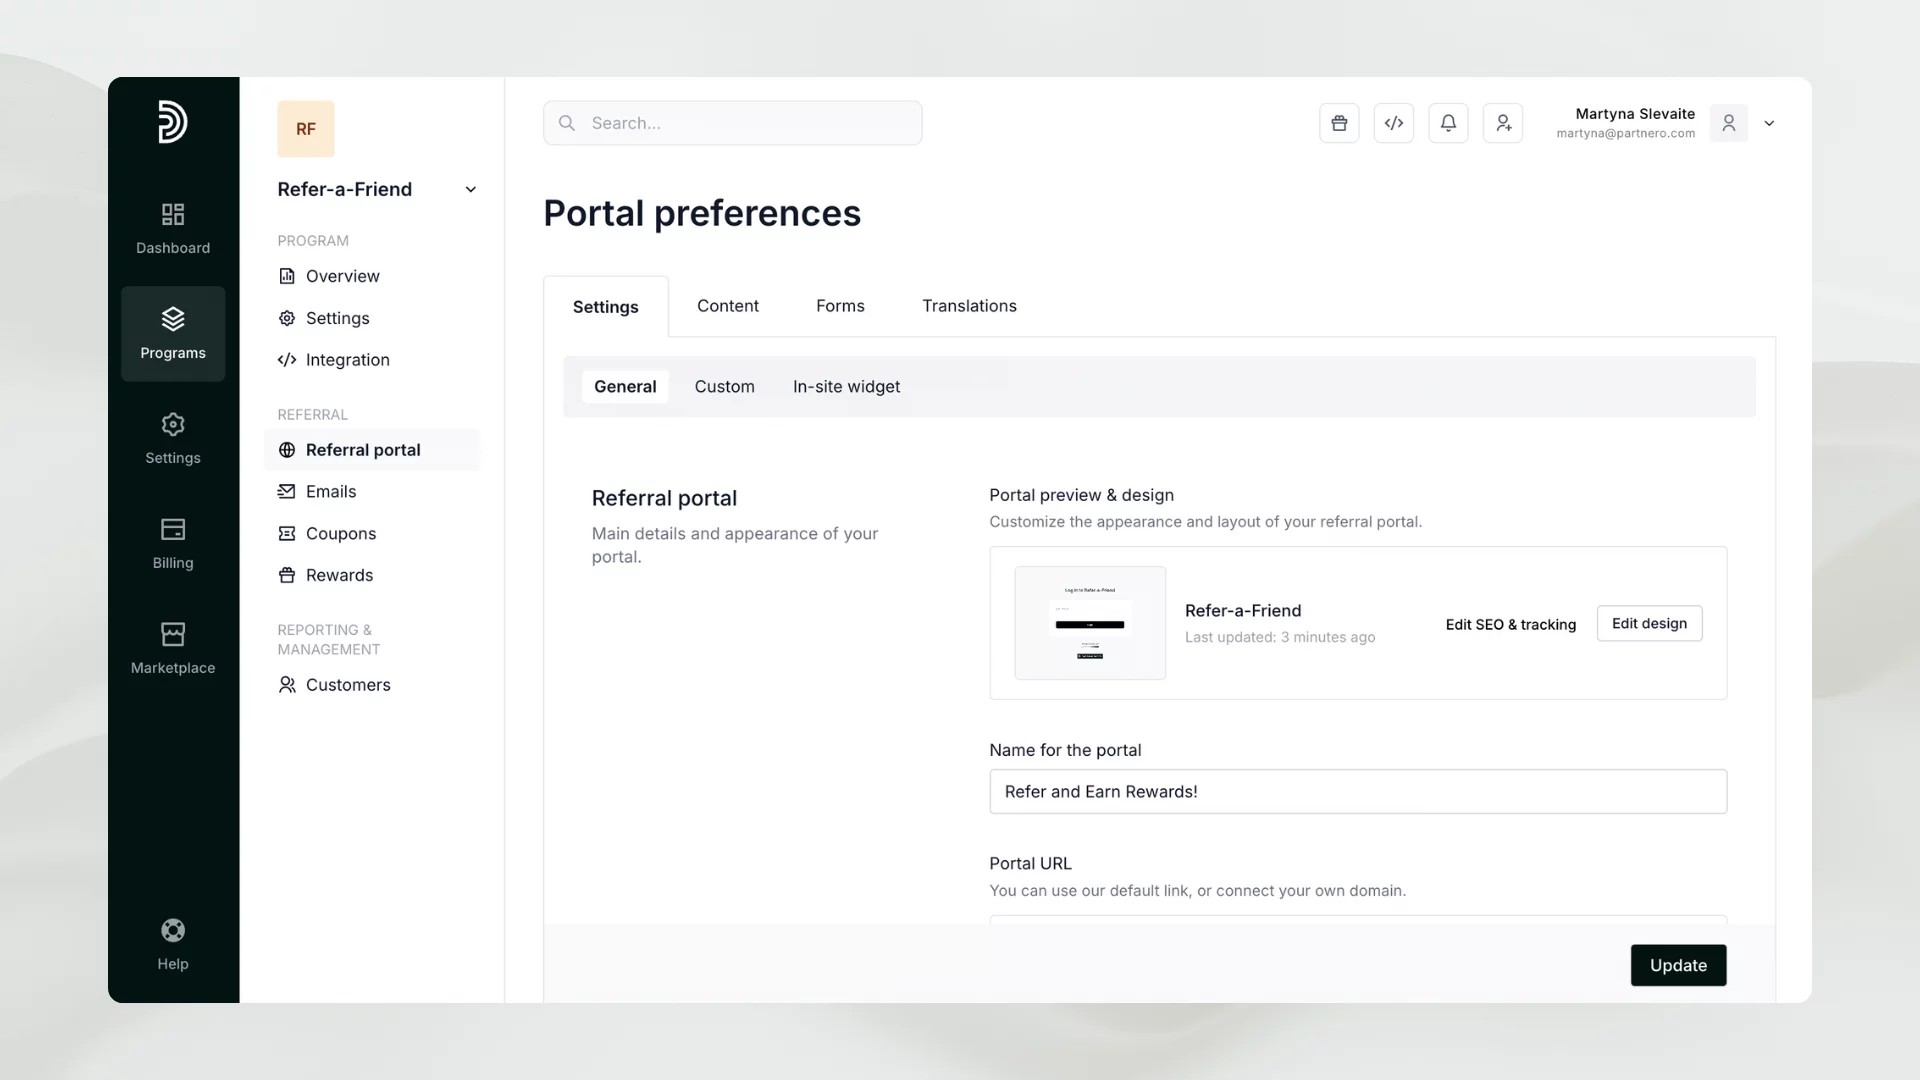
Once your customers access the referral portal (which you can link to from your website), they can log in using their email address. It's important to note that no password is required. Instead, customers will receive a one-time password (OTP) via email each time they attempt to log in.
You can enable an in-site widget to provide even quicker access. An in-site widget allows access to the referral portal via your website or app. For this widget to be available, some conditions must be met, such as integrating your website. Read more about embedding an in-app widget.
Alternatively, you can choose an API integration to display referral data in your app. This is an advanced method that requires developer resources. Read more.
Integration
Once the customer list is uploaded and customers can access the referral portal, the last step is to inform Partnero of all new customers who have joined your app or website.
We recommend using Partnero Universal integration. Instructions are available on the Integration page → Guides tab.
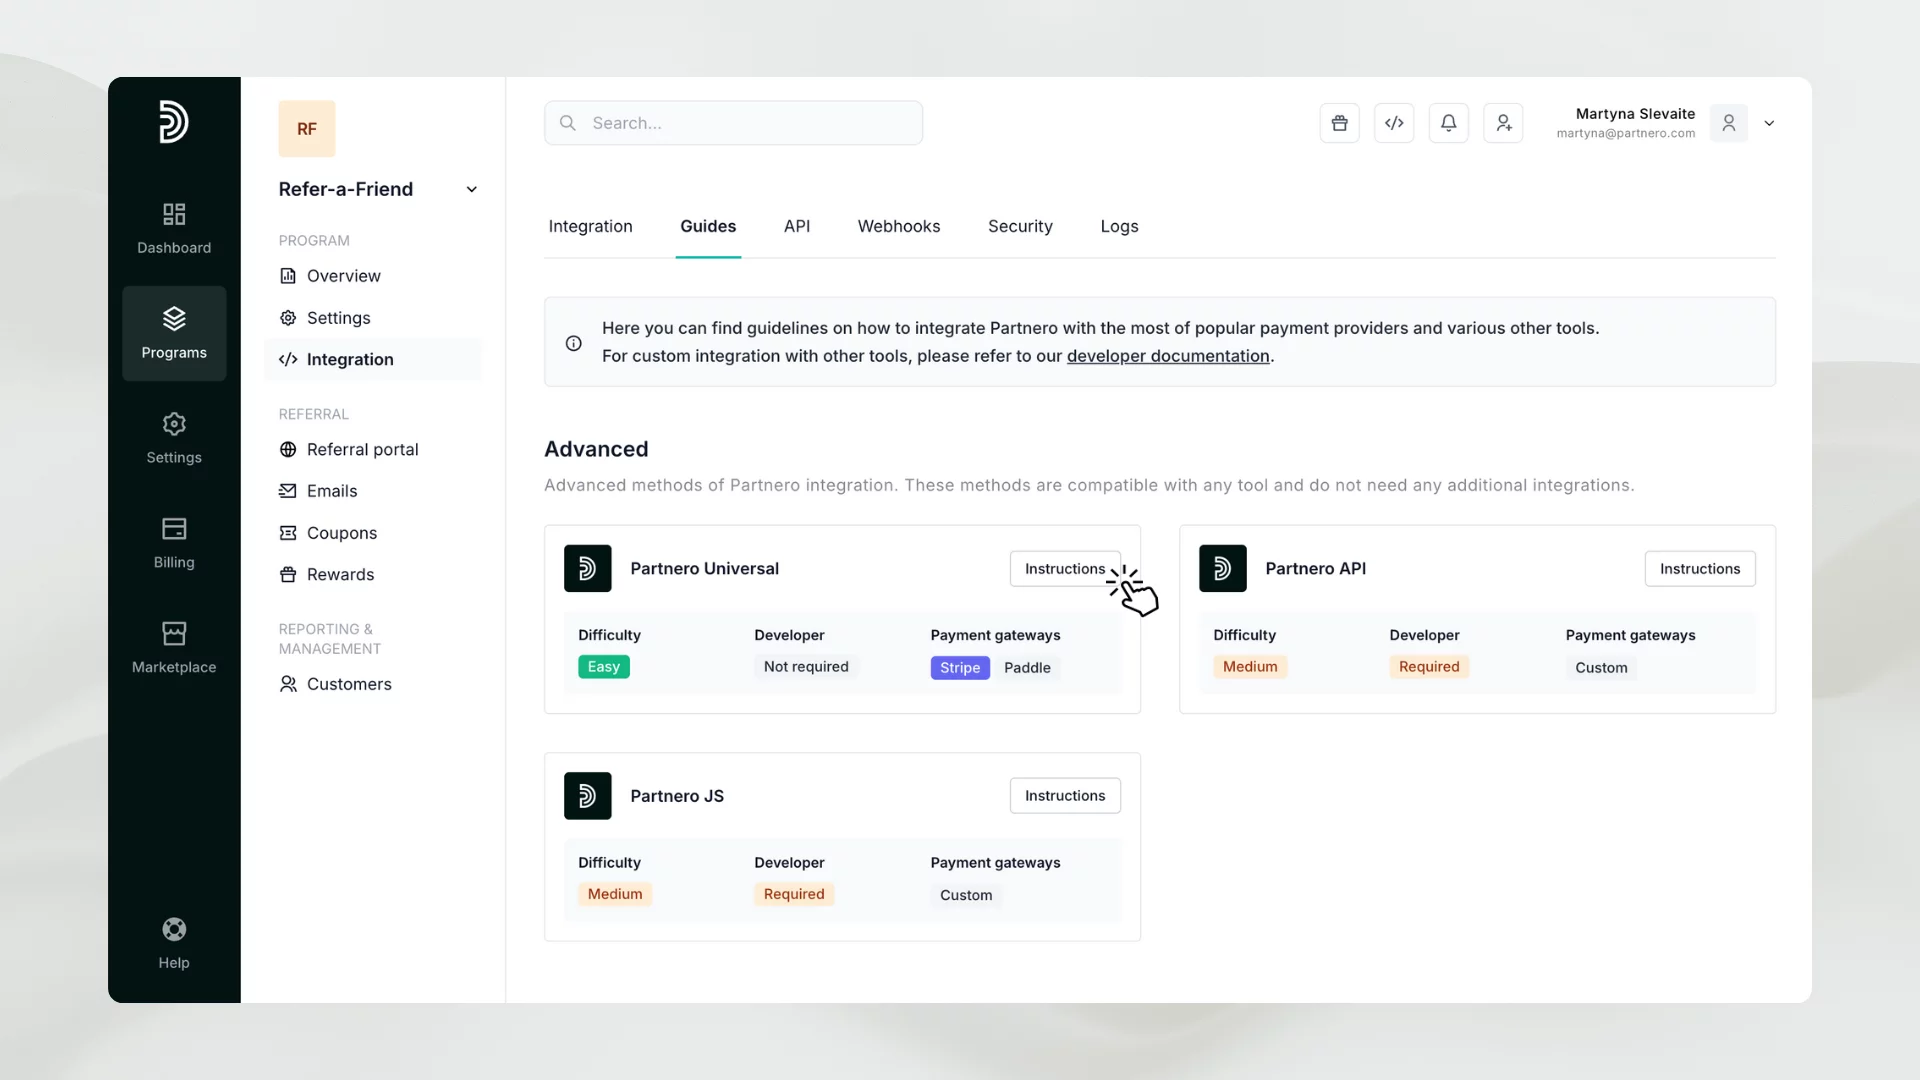
Here are the requirements for a smooth integration process:
Your website needs to be hosted under your domain.
You need to have access to edit the website’s or app’s HTML form.
All forms (including your signup form) must be hosted on your website (not inserted as an iframe using another domain or service).
1. Identify referred customers
To identify referred customers:
Navigate to Integration → Guides tab and click Instructions next to Partnero Universal.
Partnero Universal: Add the Partnero Universal snippet to the
tags of all pages on your website. This snippet tracks visitors arriving via referral links by creating a cookie with the referring customer's key.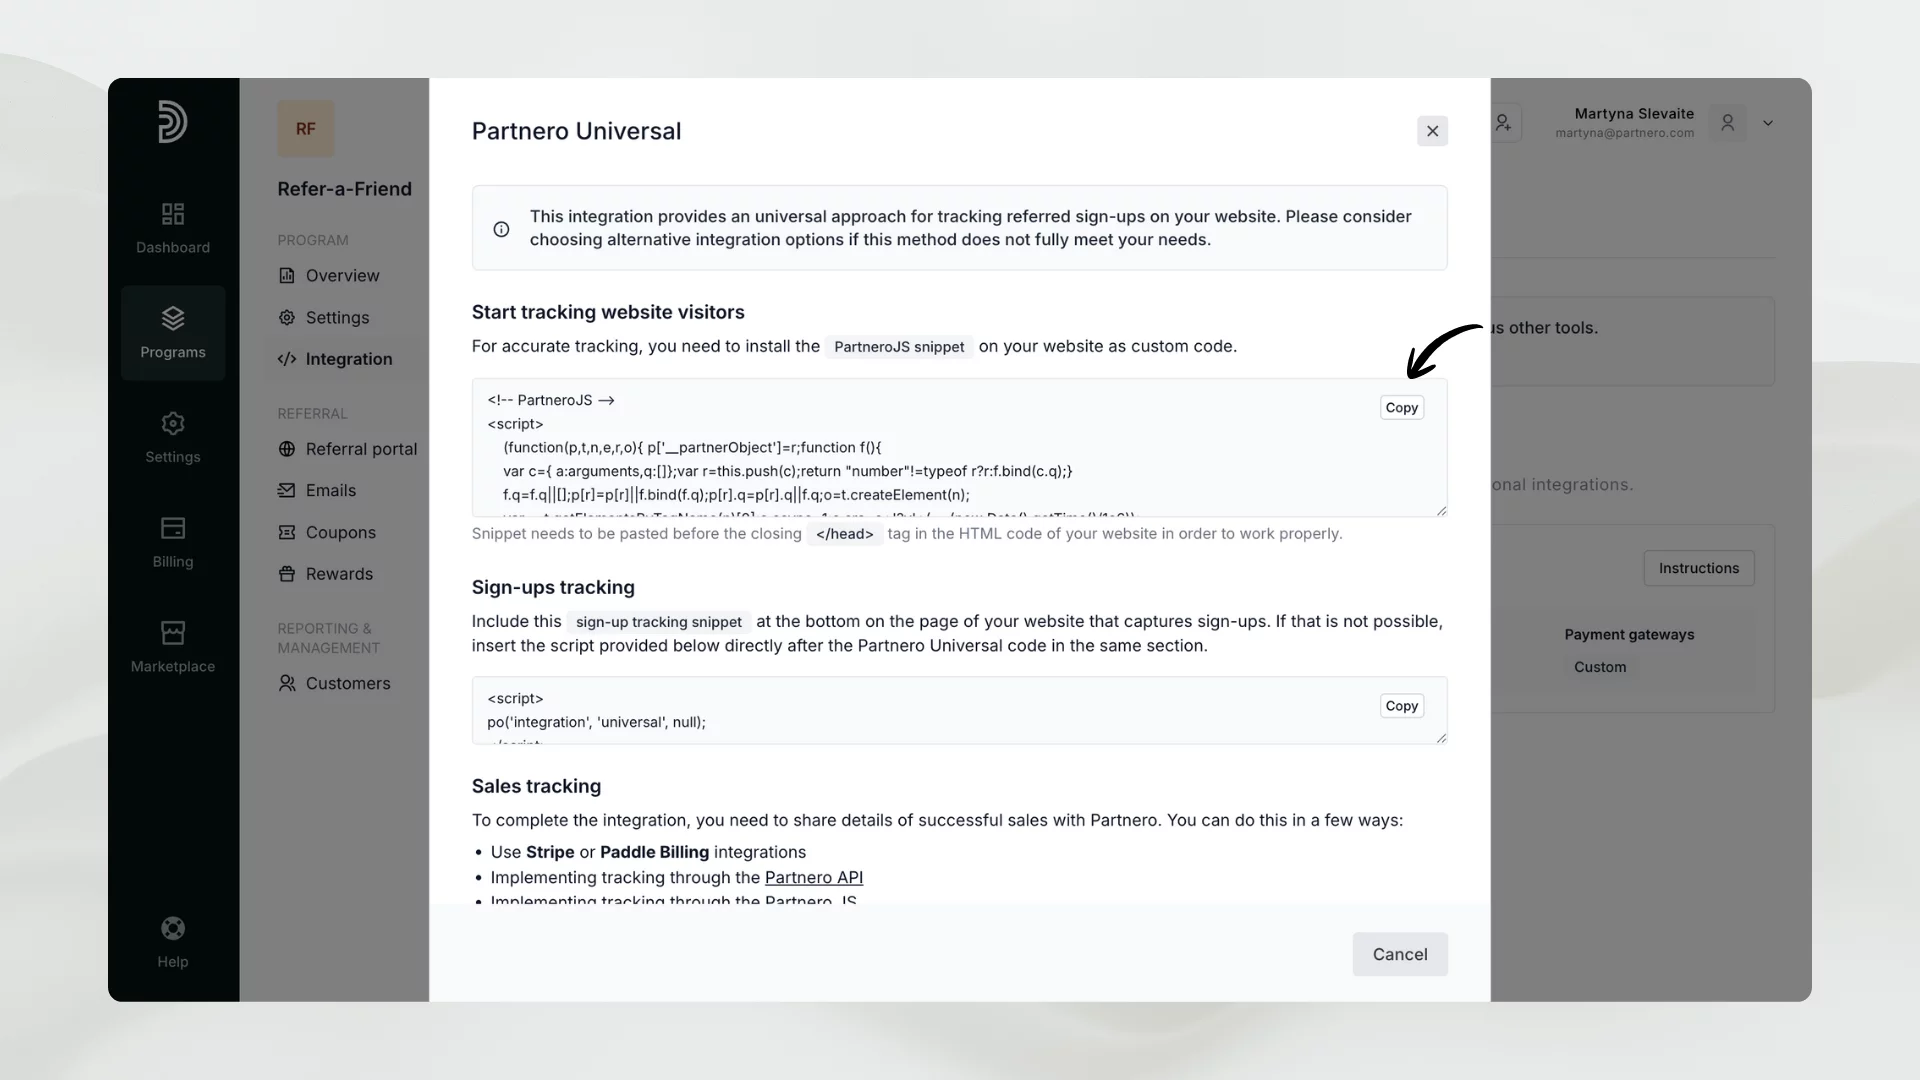
How it works: Once someone visits your website via a referral link, the Partnero Universal snippet creates a cookie on your domain with a referring customer key.
2. Track sign-ups
The second step tracks signups and creates customers on your website and Partnero account.
Signup tracking: Insert the signup tracking snippet at the bottom of your signup form page. This snippet, when combined with the Universal snippet, identifies referred visitors and creates new customer entries in Partnero.
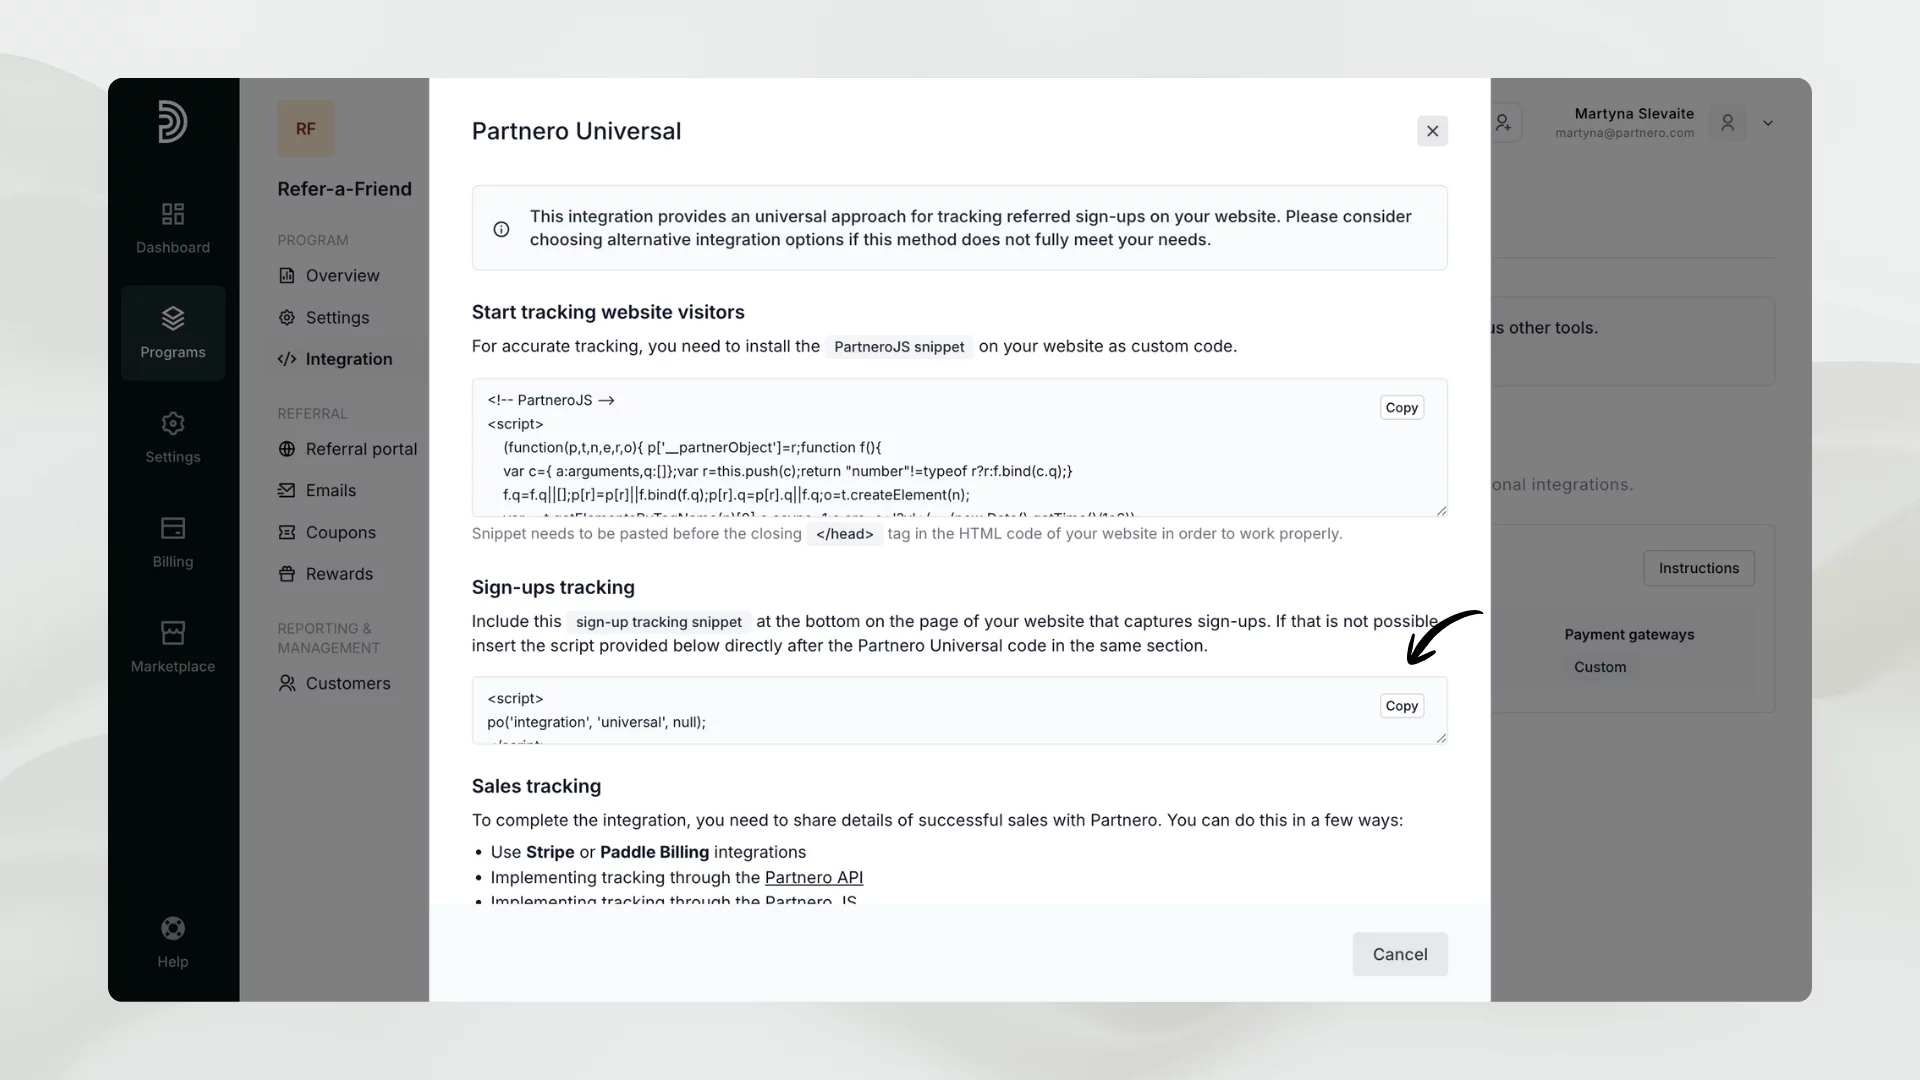
How it works: This particular snippet monitors your form signups. Once the form is submitted, the script checks the submission and checks if a Partnero cookie with a referring customer key is present. If this data is there, the customer will be created on your Partnero account. Alternatively, if there is no Partnero cookie, the script can identify a referred visitor from the URL.
Once these steps are complete, Partnero will recognize all referred customers, and the relationship will be visible on your Partnero account.
3. Track sales
If you plan to give rewards based on customer sales, it's essential to inform Partnero about every sale. The easiest way to do this is to use Stripe integration, which automatically connects customer transactions.
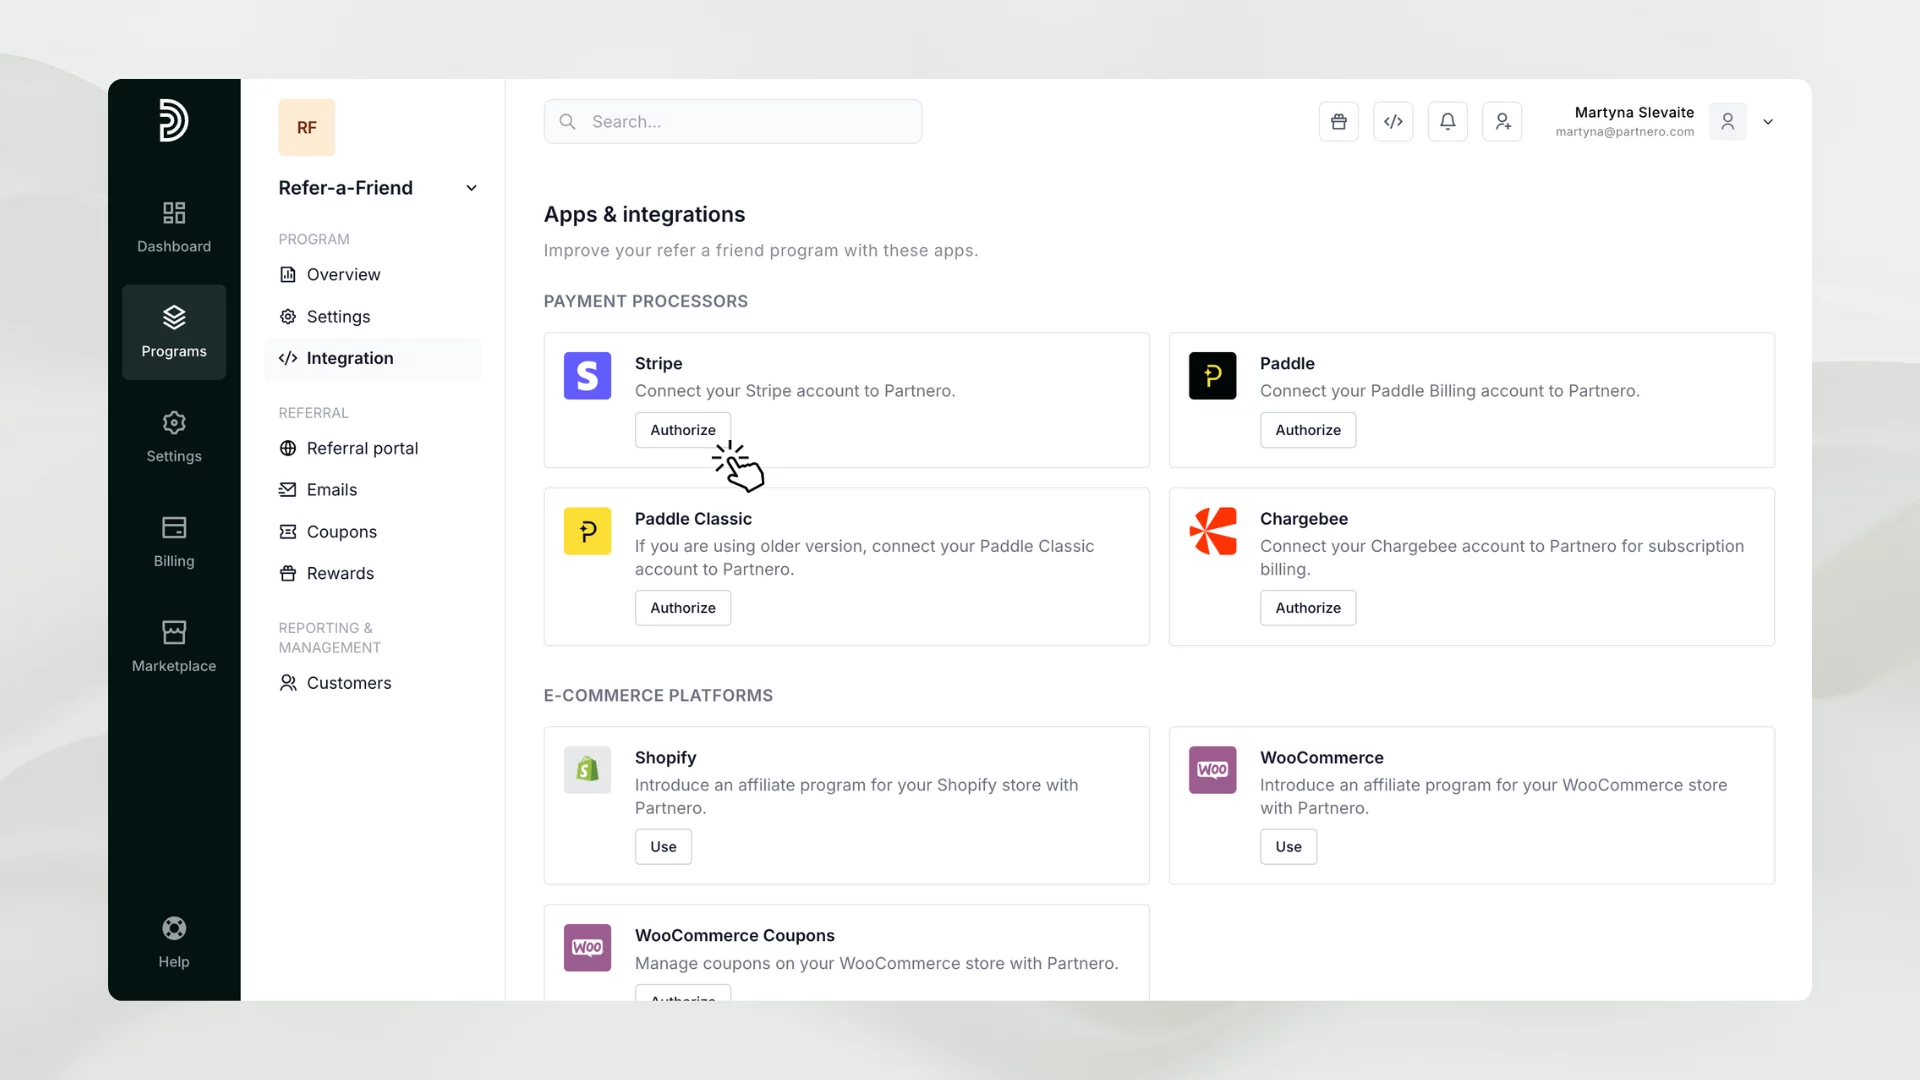
Alternatively, you can choose Partnero API or Partnero JS integrations to track transactions. Stripe or other payment gateways are not mandatory.
Set up rewards
Once the integration is complete, you can create rewards. These can be created on the Rewards page and based on signup or sale triggers.
As in our example in this article, we will issue a promotion code to both the referred and referring customers once the referral makes a purchase. Let’s examine how to create such a reward.
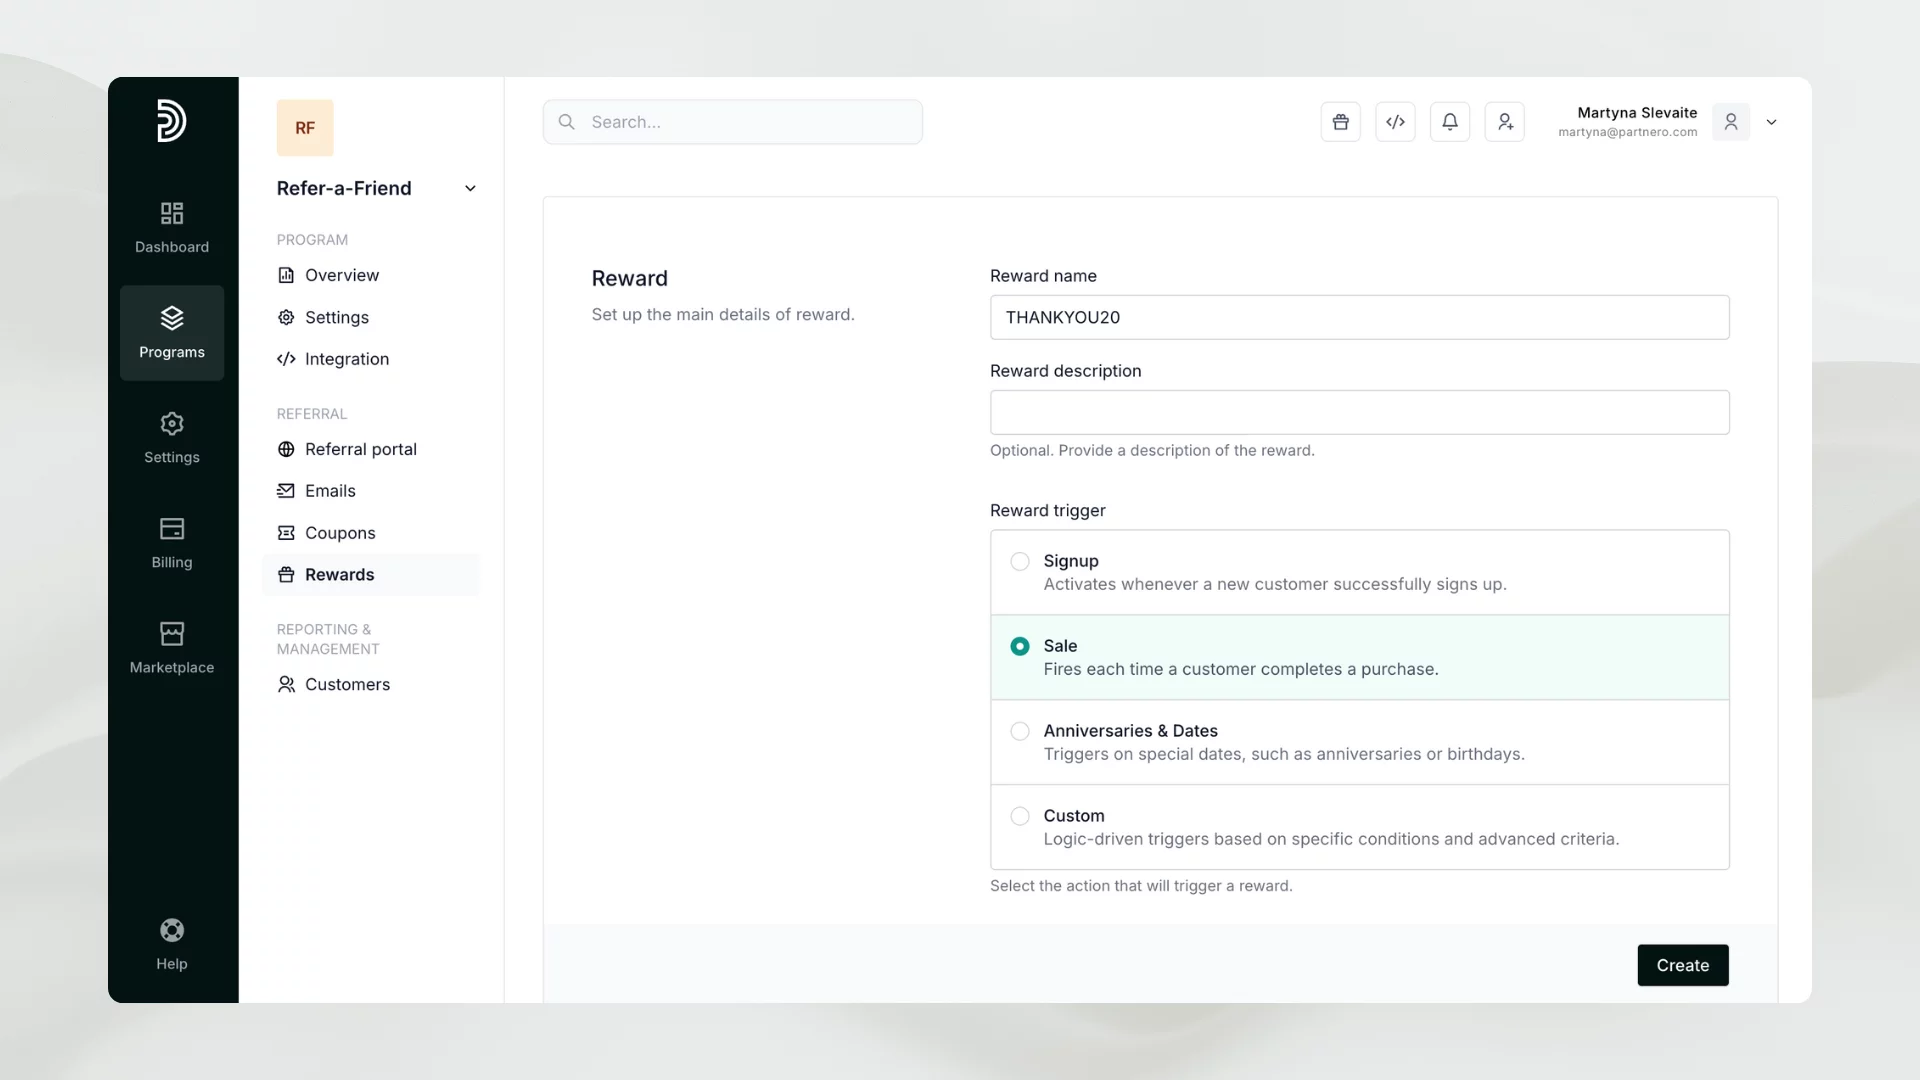
Go to Rewards → New reward.
Choose a reward name. Please note the name can be displayed in the referral portal, so we recommend having a customer-friendly name.
Choose a reward trigger. In our case, we need to choose Sale. Reward should be selected as General.
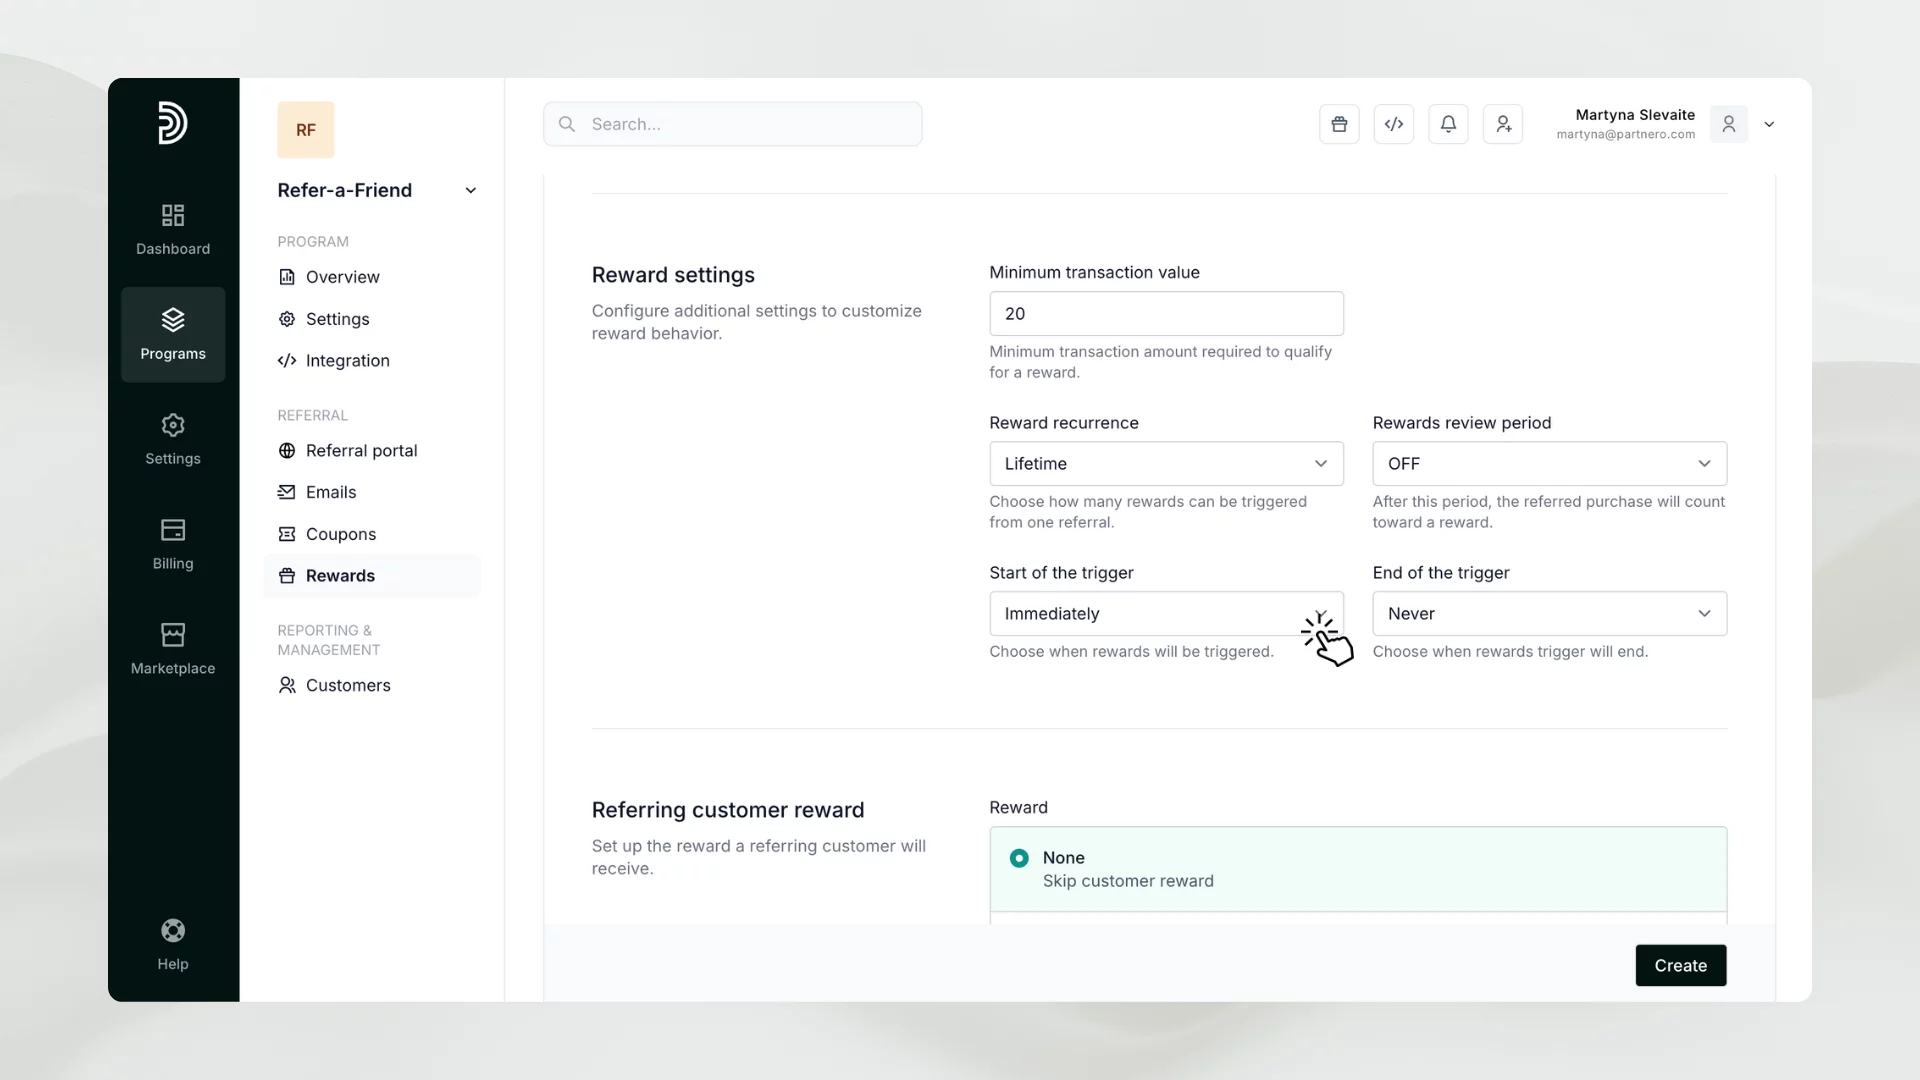
It's important to highlight the "Start of the Trigger" setting, which determines when the reward will be issued. If this trigger is not configured, the reward will be granted immediately after the first successful sale. However, if you prefer to issue a reward only after a customer has made five sales, you can easily adjust this setting to "5 times."
Now you can establish rewards for both referring customers and the customers they refer. With our Stripe integration in place, let's select dynamic coupons.
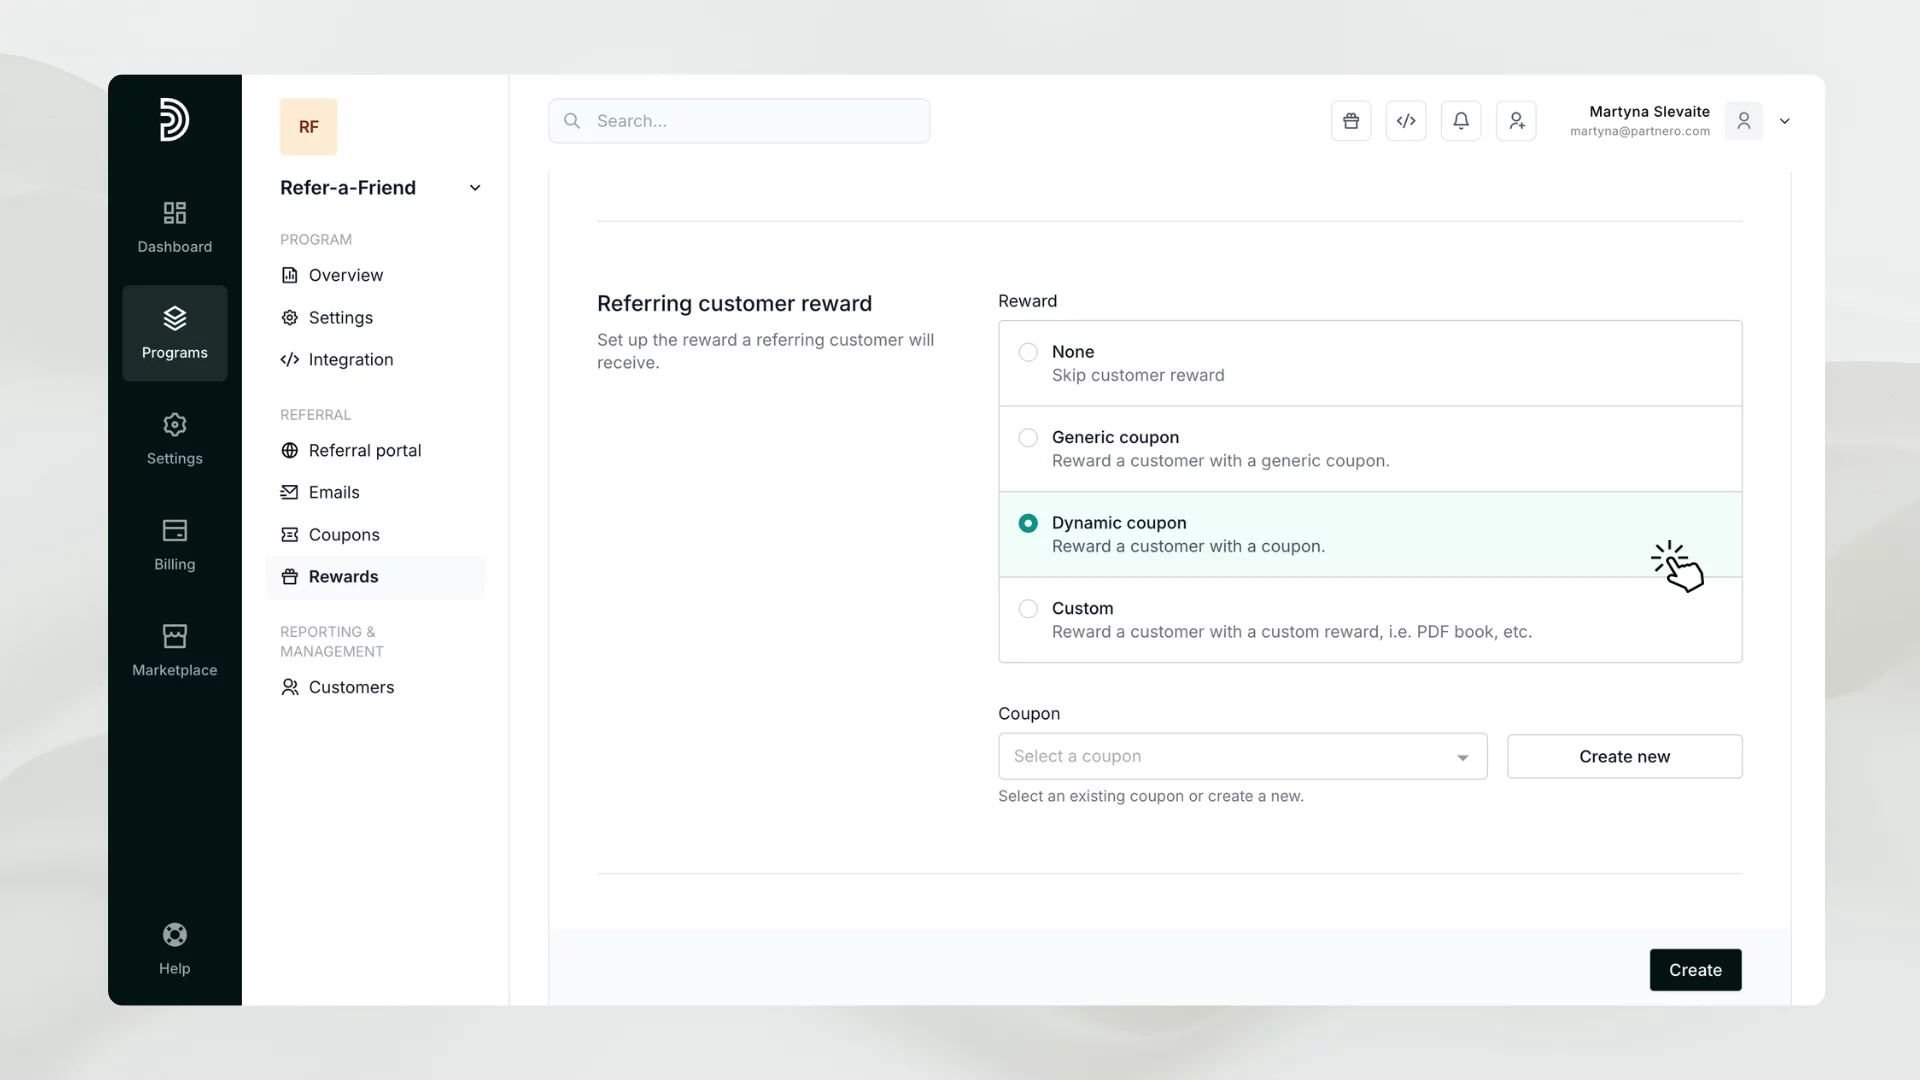
Let’s create a unique promotion code. Each time a reward is triggered, the customer will receive a unique promotion code that can be used in your application (this applies only when using Stripe as your payment gateway and when the coupon application feature is enabled).
Read more about creating dynamic coupons here.
Alternatively, you can create a generic coupon that can be used throughout your app and ensure you enter this coupon as a General coupon.
When customers fulfill the reward criteria, they will receive their promotion code. The available rewards will be displayed in the Referral portal. Additionally, you can send email notifications, which can be activated in the program settings.
Further reading
→ 15 Essential Referral Program Metrics
→ Referral Marketing 101: Explore the Power of Word-of-Mouth
Launch your program in minutes or get in touch for advanced setups.